Setting up your 3CX phone system correctly ensures seamless integration into your business environment, while optimisation enhances performance and functionality.
By carefully configuring features, integrating with existing systems, and implementing best practices for security and maintenance, you can fully leverage 3CX’s capabilities to improve communication, boost productivity, and streamline your operations.
This guide will walk you through each step, from initial installation to advanced optimisation techniques, ensuring you get the most out of your 3CX phone system.
Overview of 3CX Phone System:
- The 3CX Phone system is relatively new to the market in technology terms, but its rise in popularity over the past five years has been nothing short of amazing. With all the features you would expect in a modern VoIP Phone system, including a web client, web conferencing, mobile apps, IP Phones, SMS messaging, and integration into some of the most popular CRM application providers, it really is a complete communications system.
- It can be set up to run either in the cloud on a hosted server or on premise if you prefer the software in your offices. The software is also very small, which means a low-end PC or server will be more than capable of running the entire 3CX phone system. Hosting charges to run the software in the cloud can be as little as £15 per month.
Preparing for Setup
- Assess Your Communication Needs: The first step when moving over to a brand new VoIP system is to evaluate your current communication requirements and how 3CX can meet them. (Internal Link: [Why LeapIT Recommends 3CX Phone Systems]). It is important to consider the following items in this audit
- Opening and closing times
- Call handling options when the office is close
- Normal day to day call routes, do you have an IVR (Interactive Voice Response) where callers can select numbered options to connect straight through to Departments in your business or even voice activated controls that do the same thing
- Do you want callers to be able to leave a message (Voicemail) when you staff don't pick up and where do you want these message to be sent; global email address or individual users email addresses
- How will users interact with the phone system; desk phone, mobile app, USB headset or via PWA (Progressive Web App)
- Do you need a conference phone?
- Do you want custom on-hold music when callers are placed on hold? These can be recorded to give messages about your business and the services you offer.
- Gather Necessary Resources: Firstly you need to decide if you want to have the 3CX software in your office (relying on your internet connection) or hosted in the cloud. 95% of our 3CX installs have all been in the cloud, it is far more reliable than having it on premise. If your internet connection was to go down in your office, your phones would also be down, this is not the case in the cloud. You also need to decide how your users will interact with the 3CX phone system, if you are going down the desk phone route, each phone will need power or a PoE switch if you have one.
Step-by-Step Setup Guide
- Initial Installation: 3CX can be used via a standard web browser on most operating systems and can be installed as a PWA (Progressive Web App) on Windows, MacOS, and Chrome OS.To download the PWA app, click the Apps button in the bottom left corner of the 3CX Web Client. (Internal Link: [Technical Aspects and Integration])

Then click on “Web App (PWA)”. There is also a version of the 3CX app available on the Microsoft Store for Windows, as well as an Android app and iOS app - Configuration: You will need at least one SIP trunk to receive and make external calls, SIP trunks are managed in the 3CX Admin Console, under ‘Voice & Chat’. You will need to use the specific details provided by your SIP provider to get the SIP up and running. It also highly recommended to use a supported 3CX SIP provider. These can be found here: https://www.3cx.com/partners/sip-trunks/ (Internal Link: [Understanding SIP Trunks])User extensions and names are also created within the 3CX Admin Console, see below:-
Once saved, 3CX automatically sends an email to the user you have entered, prompting them to create a password for their 3CX account/extension. The email also tells the user the website address needed to access the 3CX Web Client as well as what their extension number is and how to access their voicemail.Call Routing has been overhauled in Version 20 of the 3CX software and is now under Call Handling, where calls are routed based on Ring Groups, Call Queues, and Digital Receptionists. - Integration with Existing Systems: 3CX supports several popular CRM, ERP and accounting systems as per the list below (Internal Link: [CRM Integration and Compatibility])
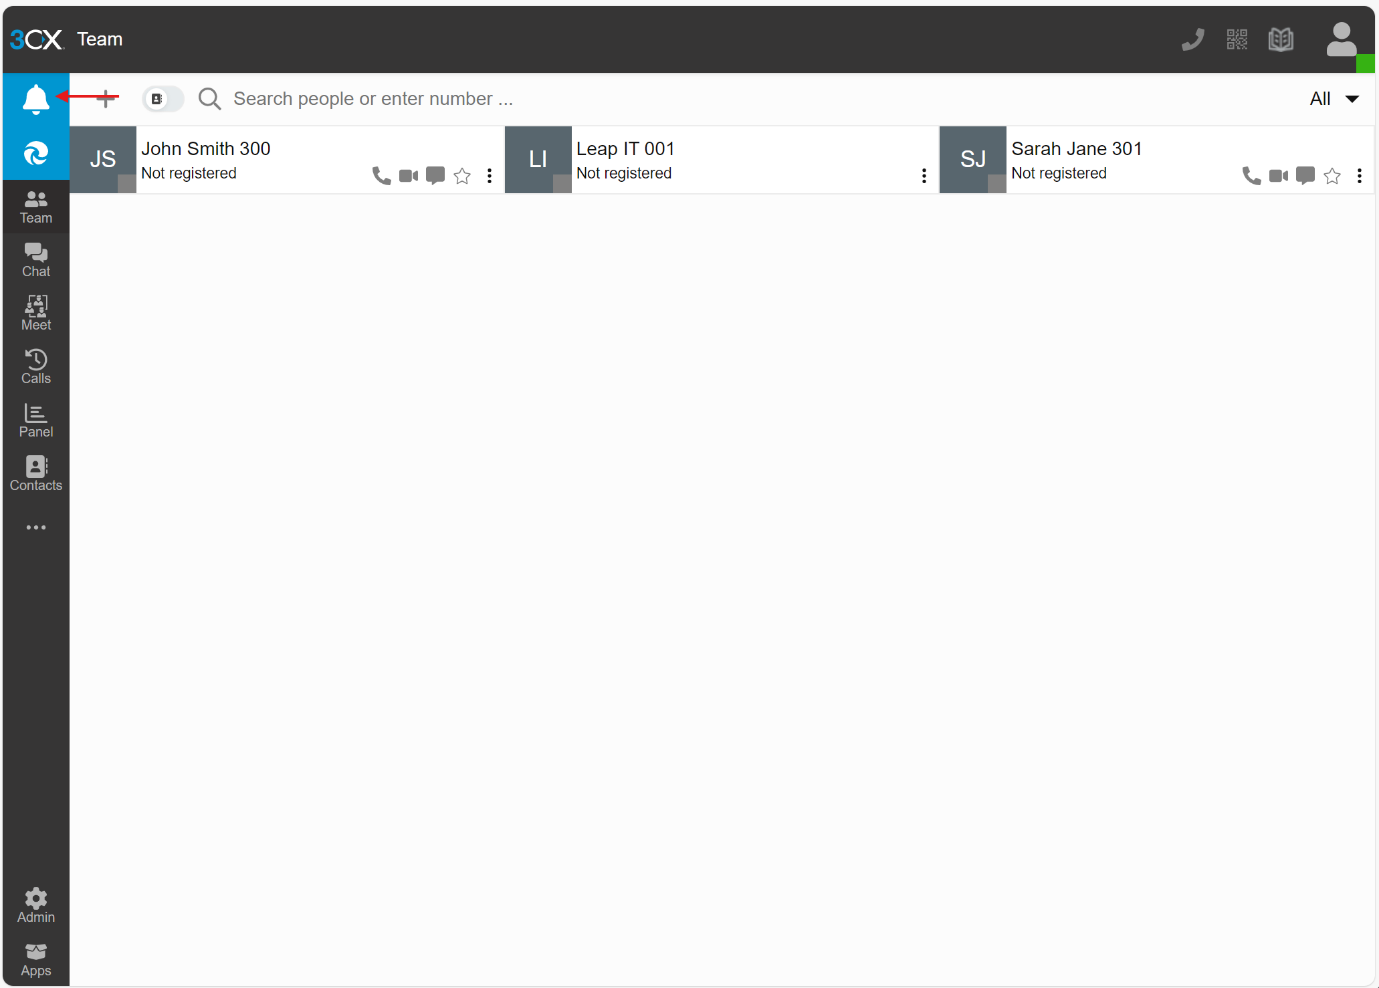
Configuration varies depending on the CRM you want to use, but 3CX has a step-by-step guide for each CRM shown above with exact instructions on how to configure the integration. - Testing and Troubleshooting: The 3CX Web Client and PWA app both rely on browser permissions to function correctlyIf you are seeing a bell in the top left corner of your web browser, this indicates that 3CX has not been given the correct notification permissions on the user's device. Clicking the bell will trigger the web browser to ask if you want allow 3CX the relevant permissions to function correctly. Once you have accepted this, the bell will disappear and your web browser is fully configured to work with 3CX
An ‘Echo test’ feature is also available which lets you do a test call and hear yourself. This can be done by dialling *777 and is helpful in verifying the microphone/headset is working correctly.


 User extensions and names are also created within the 3CX Admin Console, see below:-
 Call Routing has been overhauled in Version 20 of the 3CX software and is now under Call Handling, where calls are routed based on Ring Groups, Call Queues, and Digital Receptionists.

Optimising Your 3CX Phone System
- Customising Features: Call recording can be enabled or disabled on a per user basis and you can also set the 3CX phone system to to record external calls only or record all calls.You can allow users to access their own call recordings in the 3CX admin console or keep it restricted to administrators only.You can also allow users to start and stop call recordings or keep call recordings permanently on to record all internal and external, this feature requires the Enterprise version of 3CX however.
Digital Receptionist (IVR) enables you to seamlessly direct callers to the correct extensions, queues or ring groups. With a standard IVR menu you can configure up to 10 options which callers can choose from. You can create as many IVR menus as you want (although each requires an extension number, so that can become a limitation) (Internal Link: [Key Features of the 3CX Phone System])
The 3CX Mobile App is also available for Android and iOS devices. The 3CX Mobile App is setup by scanning a QR code that either the administrator can provide, or the user can get for themselves via the 3CX Web Client using the QR code button in the top right.
- Advanced Call Management: You can also change where calls go if they are unanswered, the default setting is voicemail, but it can alternatively be forwarded to a call queue, another extension, an external number, or just reject the call with a busy message.By default, unanswered calls go to voicemail after 20 seconds, this can be customised on an extension by extension basis.Each extension has voicemail enabled by default, there is a default greeting for this or you can upload your own
Voicemails can be accessed in the Voicemail section of the 3CX Web Client / PWA, or via calling 666
Voicemails can be received as an attachment to an email or kept in 3CX with just an email notification (Internal Link: [Advanced Call Management])
- User Training and Adoption: There are already some really good user guides on the internet and we would recommend looking at the 3CX User Manual here and the 3CX mobile app installation guide here (Internal Link: [Getting Started])
Enhancing Security and Reliability
- Implementing Security Measures: The default security settings configured when 3CX first installs are pretty good out the box, however we would recommend you take some extra steps as follows
- 3CX allows you to configure which countries you can call and it is best practice to set these to be as restrictive as possible
- The 3CX Admin Console can also be configured to restrict who can access the Admin Console and even from what location (for example only from your office) using certain IP addresses
- Backups can be protected by a password if required as well
- If there is a firewall in front of the 3CX server only allowing SIP traffic from your SIP provider’s IP address is also a good idea. (Internal Link: [Security and Reliability])
- Ensuring System Reliability: 3CX have a recommended minimum specification for the server you are hosting the 3CX software on (either cloud or on premise) based on several criteria including the number of users and calls that are expected. These minimum specification settings can be found here
- It is highly recommended to leave automatic updates enabled as well. This will automatically update 3CX when an update is available at the specified time. This also automatically installs security updates for the operating system that 3CX is running on, we recommend you run your 3CX software on a Linux based operating system.We also recommend regular reboots of the 3CX server in order for installed operating system updates to apply.It is also recommended to enable scheduled backups and adopt a good backup strategy which includes cloud or offsite storage to help facilitate the recovery of the 3CX server in a disaster recovery scenario. 3CX supports a number of cloud providers along with more traditional SMB/SFTP options if needed

Ongoing Maintenance and Support
- Regular Updates: It is important to keep your 3CX system up-to-date with the latest features and security patches. This will ensure any bugs or security issues that are identified with the product will be fully patched on your own 3CX system (Internal Link: [Ongoing Support])
- Accessing Support: Leap IT offer full support on all our 3CX Phone installs as part of the installation. One of the advantages to having your VoIP phone system with the same Company that manages your IT is that it reduced the blame shifting that often exists between suppliers. (Internal Link: [Getting Started])
Conclusion
- Summary: The key steps when moving to a 3CX VoIP Phone system are
- An internal audit of your current phone system including call routes currently, out of hours settings and user settings
- Decide if you want to host your 3CX phone system on the cloud or on premise in your offices
- Install the 3CX software, configure the SIP trunks and advance security features as mentioned above
- Configure the user extensions, configure desk phones and mobile phone apps
- Re-direct your current number to a new 3CX number to make the system live and the initiate a port of your current phone number into the 3CX system (this can take up to 30 days)
- Call-to-Action: If you would like any further information on our 3CX phone system or a demonstration please contact LeapIT. (Internal Link: [Contact LeapIT])